A long time back, during my college days, I had built a line following robot using an 8051 microcontroller. After college that robot aged and died in my backyard shed. Ever since I’ve been planning on resurrecting her, and finally did, using an Arduino Uno.
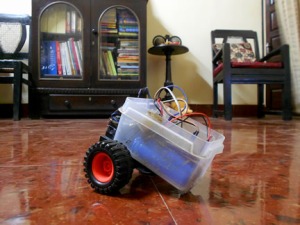
To make the robot platform I used two geared motors from an old toy crane, and a cheese tub.
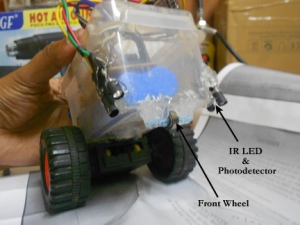
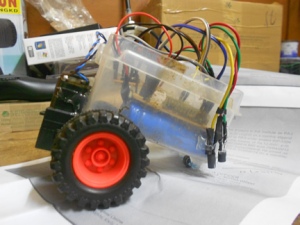
Here’s a view after attaching a front wheel and IR sensors.
The sensors should be placed with a slight clearance from the ground.
You might have noticed that I’m not using the standard Arduino Uno board. I made my own PCB’s for prototyping, preferring to use the original Uno board only for final projects. The eagle files are available in my github repository:
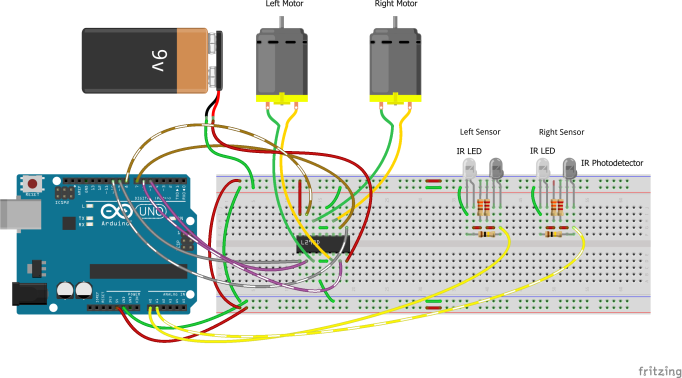
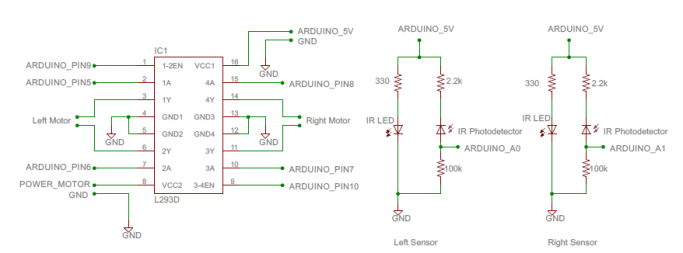
Here’s a fritzing representation and schematic of the connections
Finally, we have the arduino sketch
// Line follower using 2 IR photodetectors

int EN_A = 9; // to 1,2EN of L293D
int EN_B = 10; // to 3,4EN of L293D
int IN_A1 = 5; // to 1A of L293D
int IN_A2 = 6; // to 2A of L293D
int IN_B1 = 7; // to 3A of L293D
int IN_B2 = 8; // to 4A of L293D

int speed = 100;
boolean direction = 1; // 1 (true) indicates forward, 0 indicates reverse
int left = 0;
int right = 0;

int limit = 900; // IR photodetector values above the limit indicates an
                 // IR reflection from a white surface.

void setup()
{
    init_motors();
    Serial.begin(9600);
}

void loop()
{
    read_sensors();
    move_robot();
    delay(10);
}

void read_sensors()
{
    // value of IR sensor reading should be above the limit when
    // the sensor is above a white surface
    left = analogRead(A0);
    right = analogRead(A1);
    Serial.print("Left: ");
    Serial.print(left);
    Serial.print(" Right: ");
    Serial.println(right);
}

void move_robot(){
    if ( left >= limit && right >= limit ) {
        // robot on white surface
        // make robot move forward
        set_left_motor(speed, 1);
        set_right_motor(speed, 1);
        Serial.println("Moving Forward");
    }
    else if ( left < limit && right >= limit ) {
        // robots left sensor above the black line, right sensor on white surface
        // make robot turn left
        set_left_motor(0, 1); // turn off left motor
        set_right_motor(speed, 1); // right motor turned on
        Serial.println("Turning Left");
    }
    else if ( left >= limit && right < limit) {
        // robots right sensor above the black line, left sensor on white surface
        // make robot turn right
        set_left_motor(speed, 1); // left motor turned on
        set_right_motor(0, 1); // turn off right motor
        Serial.println("Turning Right");
    }
    else {
        // both sensors above the black line
        // make robot stop
        set_left_motor(0, 1);
        set_right_motor(0, 1);
        Serial.println("Stop Moving");
    }
}

void init_motors()
{
    // set output modes
    pinMode(IN_A1, OUTPUT);
    pinMode(IN_A2, OUTPUT);
    pinMode(IN_B1, OUTPUT);
    pinMode(IN_B2, OUTPUT);
    pinMode(EN_A, OUTPUT);
    pinMode(EN_B, OUTPUT);

    // initialize ports to safely turn off the motors
    analogWrite(EN_A, 0);
    analogWrite(EN_B, 0);
    digitalWrite(IN_A1, 1);
    digitalWrite(IN_A2, 0);
    digitalWrite(IN_B1, 1);
    digitalWrite(IN_B2, 0);
}

void set_left_motor(int speed, boolean dir)
{
    analogWrite(EN_A, speed); // PWM on enable lines
    digitalWrite(IN_A1, dir);
    digitalWrite(IN_A2, ! dir);
}

void set_right_motor(int speed, boolean dir)
{
    analogWrite(EN_B, speed);
    digitalWrite(IN_B1, dir);
    digitalWrite(IN_B2, ! dir);
}
You can download the entire project folder here
Pingback: Little Robot And Some Comments, Let’s | The Arts Mechanical